Welcome to BRUME STUDIO
BRUME STUDIO lets you compose 8-bit music, the sound of 1980s game consoles, right in your browser. You don’t need to read sheet music: this guide takes you from your very first click to an audio file ready to share.
Allow ten minutes for “Your first song”. Read the other chapters whenever you want to go further.
1. Before you start
- A computer with a mouse (or touchpad) and a keyboard. On a phone or tablet the studio is displayed but can’t be used properly.
- A recent browser: Chrome, Edge, Firefox or Safari.
- Sound on, or headphones. The studio makes no sound until you have clicked once in the page: that’s a browser rule.
- Nothing to install, no account to create. Your song is saved automatically in this browser: it will be there when you come back, even after closing the tab.
How the sound is made
The studio imitates the sound chip of an 8-bit console. It has four channels (tracks), and each one plays only one note at a time:
- Pulse 1 and Pulse 2: a bright, buzzy sound, perfect for melody and accompaniment;
- Triangle: a round, soft sound, used for the bass;
- Noise: a hiss used for drums (kick, snare, hi-hat…) and ambiences (wave, wind, rain).
Each track has its own colour, used everywhere in the studio.
2. A tour of the screen
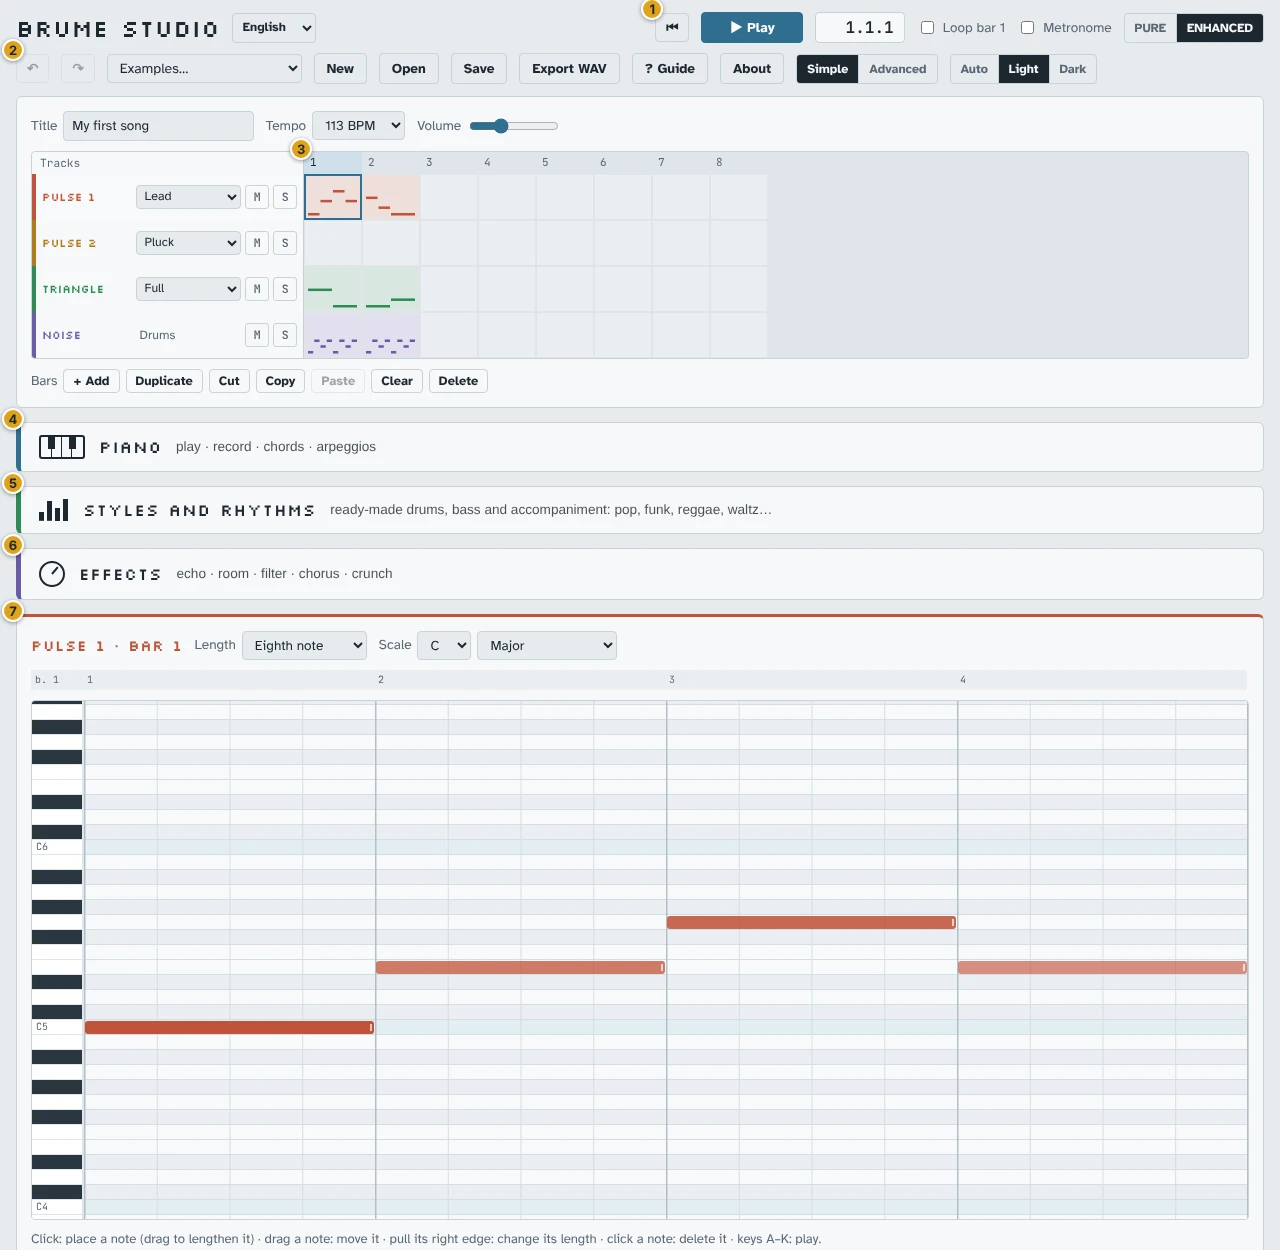
- 1Playback: start and stop the music, loop a passage, metronome, PURE or ENHANCED sound.
- 2File: undo, examples, new song, open, save, export WAV, this guide, modes and theme.
- 3Sequencer: the map of your song. One row per track, one column per bar.
- 4Piano: a keyboard to play, record and lay down chords.
- 5Styles and rhythms: drums, bass and accompaniment generated in one click.
- 6Effects: echo, reverb, filter… (in Advanced mode).
- 7Note editor: the grid where you write the notes of the cell chosen in the sequencer.
Remember the key idea: the sequencer (top) says where each piece of music goes, the note editor (bottom) says what it contains. Choose a cell at the top, write its notes at the bottom.
3. Your first song, step by step
We’ll write a short melody, a bass line and a drum beat over two bars, then listen to them in a loop.
- Start from a blank page. Click New in the top bar. The sequencer empties; nothing is lost, Ctrl+Z brings the previous song back.
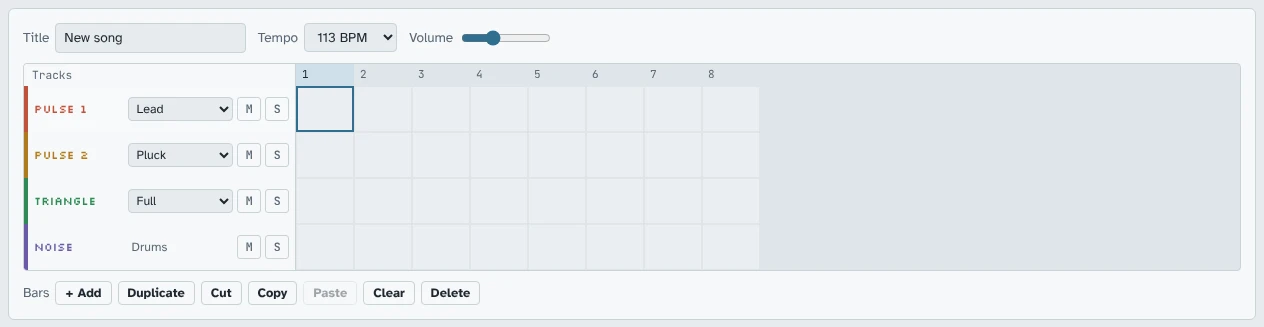
An empty song: eight bars, four tracks. The outlined cell is the selected one. - Give it a name in the Title field and pick a Tempo (speed, in beats per minute). 113 BPM is a good speed to start with.
- Select the first cell of the Pulse 1 row (column 1) by clicking it. The note editor’s title, at the bottom, reads “Pulse 1 · bar 1”.
- Place some notes. In the editor, each row is a pitch (highest at the top) and each column a moment in the bar. Click in the grid: a note appears and you hear it. The light rows are the notes of the chosen scale: stay on them and it always sounds right.
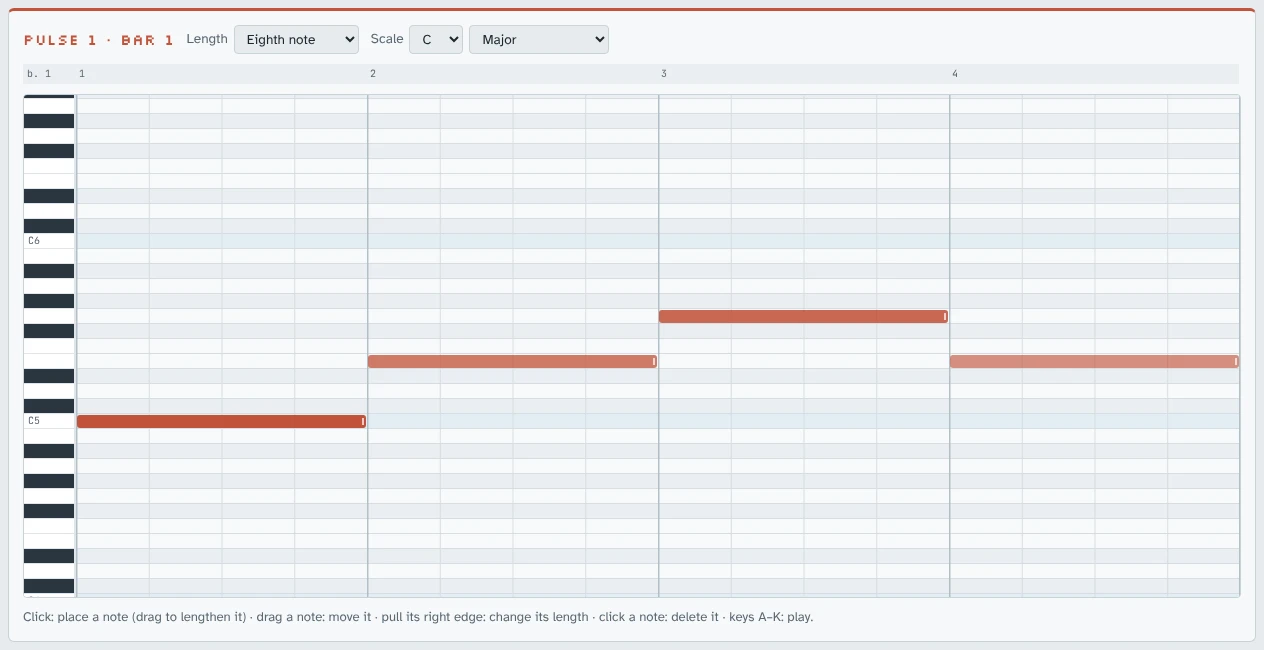
Four quarter notes. The numbers 1 to 4 at the top are the four beats of the bar. - For a longer note, click and drag to the right while placing it, or choose a longer Length before clicking.
- To move it, drag it. To change its length, pull its right edge.
- To delete it, click it (or right-click).
- Listen: press Space or ▶ Play. Press again to stop. Tick Loop bar 1 to keep the bar playing while you edit it: you hear changes immediately.
- Carry on in bar 2: click the next Pulse 1 cell and place more notes. To loop both bars, click cell 1, then Shift+click cell 2: the Loop box now reads “bars 1–2”.
- Add a bass: click cell 1 of the Triangle row and place one or two long notes. The triangle sounds an octave lower: aim for the bottom of the grid.
- Add drums: click cell 1 of the Noise row. The grid becomes a drum machine, one row per instrument. A classic: kick on beats 1 and 3, snare on 2 and 4, hi-hat in between.
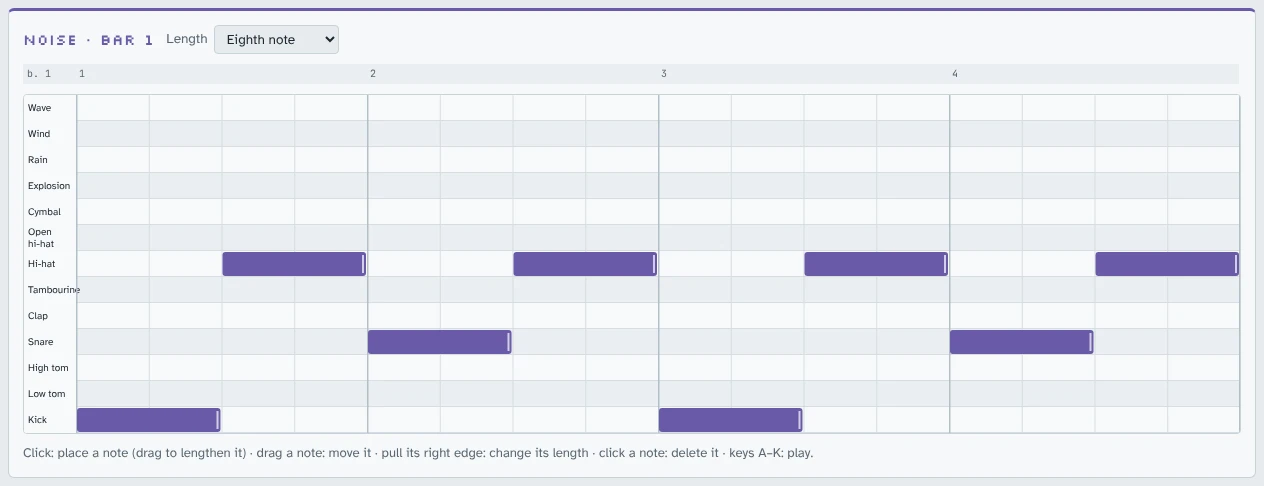
Drums: one row per sound. The four dotted rows at the top are ambiences (wave, wind, rain, explosion) to place as long notes. - Play it all: press Space. Your song has a melody, a bass and drums!
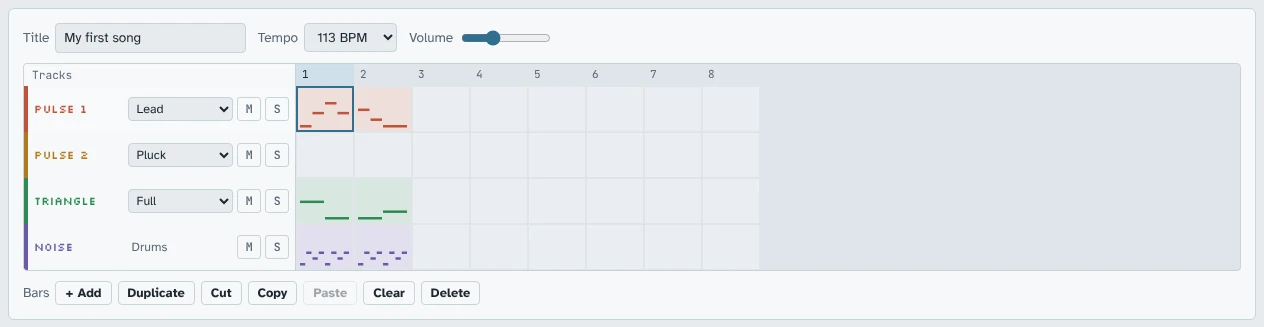
Each filled cell shows a preview of its notes. - Keep it: it is already saved in the browser. For your own copy, click Save (project file you can reopen) or Export WAV (audio file you can play anywhere).
4. The top bar

- 1▶ Play / ■ Stop (Space). Playback starts from the selected bar; ⏮ goes back to the start. The counter shows bar.beat.step.
- 2Loop: replays the selected bar or bars endlessly.
- 3Metronome: a click on each beat, to play in time.
- 4PURE / ENHANCED: the exact console sound, or with the studio’s extras (see PURE or ENHANCED).
- 5↶ Undo (Ctrl+Z) and ↷ Redo (Ctrl+Shift+Z). Almost everything can be undone: don’t be afraid to experiment.
- 6Examples…: loads an example song (get yours back with Ctrl+Z).
- 7New: empty song. Open: reopens a saved file.
- 8Save: downloads the project (a
.brume.jsonfile). - 9Export WAV: downloads the song as an audio file.
- 10? Guide: opens this guide in a new tab. About: who made the studio and how to get in touch.
- 11Simple / Advanced: shows fewer or more settings (never changes your song). Auto / Light / Dark: screen colours.
- 12The interface language: French, English or German. The page reloads, your song is kept.
Just below: the song’s Title, its Tempo and the listening Volume (which doesn’t affect the exported file).
5. The sequencer
The sequencer is the map of the song: one row per track, one column per bar. A bar lasts four beats (a “one, two, three, four”). Each cell holds the notes of one track during one bar.
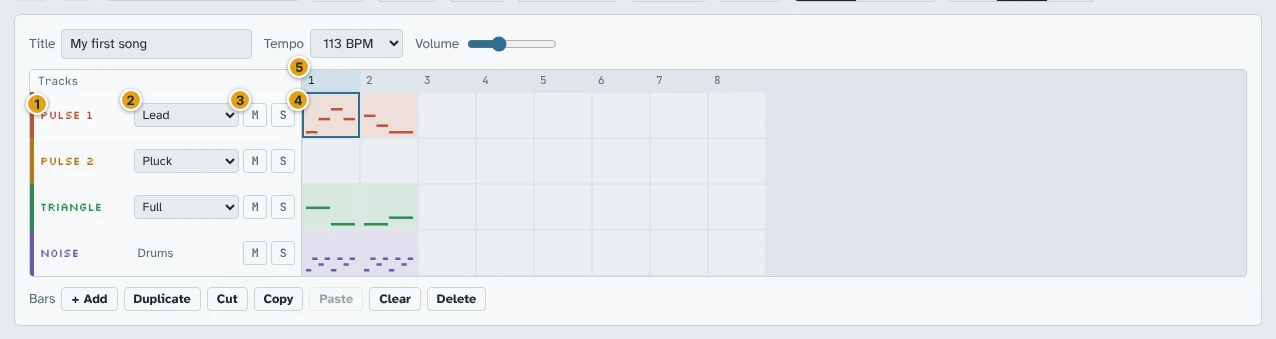
- 1The track name: click it to select the track.
- 2The track’s instrument: Lead, Pluck, Soft, Hollow flute… Try them while the song plays.
- 3M (mute) silences the track.
- 4S (solo) plays only this track (several tracks can be soloed).
- 5The grid of cells. The row of numbers at the top is the bar ruler.
Selecting
- Click a cell: selects it, and the note editor shows its contents. Double-click: opens it in the editor.
- Shift+click: extends the selection over several bars.
- Click a number on the ruler: selects the whole column (all four tracks).
- With the keyboard: arrow keys to move, Shift+arrows to extend, Enter to edit.
Arranging bars
The buttons below the sequencer act on the selection:
| Button | Effect |
|---|---|
| + Add | adds an empty bar at the end |
| Duplicate (Ctrl+D) | inserts a copy of the selected bars right after them: ideal for a repeating chorus |
| Cut / Copy / Paste | just like in a word processor (Ctrl+X / C / V). Pasting starts at the selected cell |
| Clear (Del) | erases the notes of the cells without removing the bars |
| Delete | removes the selected bars (the following ones move left) |
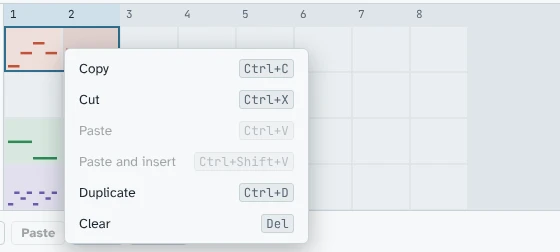
Right-clicking a cell opens a menu with the same commands, plus Paste and insert (Ctrl+Shift+V), which pushes the rest of the song along to make room.
Dragging a cell (or the selection) moves it; hold Alt to copy it instead. You can copy between melodic tracks (from Pulse 1 to Triangle, for example), but drums stay with drums.
6. The note editor
The editor shows the selected cell. Its title gives the track and bar (“Pulse 1 · bar 3”) and takes the track’s colour.
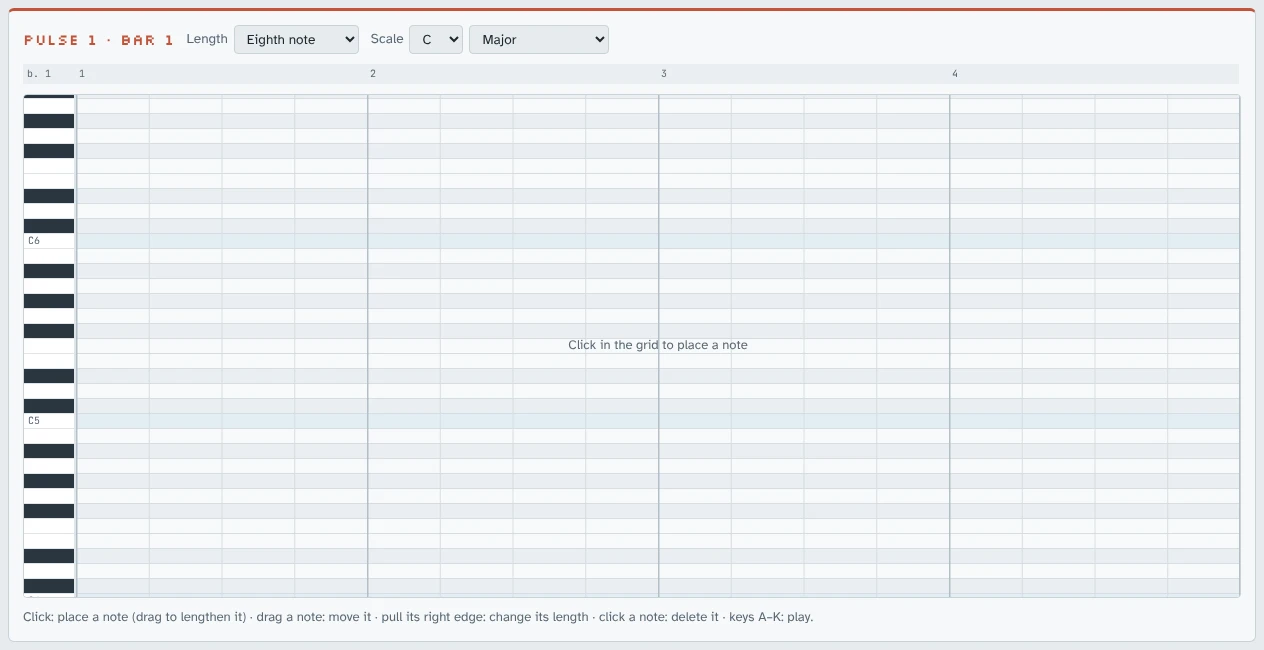
Gestures
| Gesture | Result |
|---|---|
| Click in the grid | places a note of the chosen length |
| Click + drag to the right | places a note and lengthens it |
| Drag a note | moves it (higher, lower, earlier, later) |
| Pull a note’s right edge | changes its length |
| Click a note, or right-click | deletes it |
| Keys A to K | play notes, like a piano |
Settings
- Length
- Length of the next notes: sixteenth (¼ beat), eighth (½ beat), quarter (1 beat), half (2 beats), whole (the entire bar).
- Scale
- A starting note (C, D…) and a mode (Major, Minor, Pentatonic, Blues…). The scale’s notes are highlighted and your notes snap to them: no wrong notes possible. Major sounds happy, Minor more melancholic, Pentatonic never sounds wrong.
During playback the editor follows the music and shows the bar being played. As soon as you click in it, it stays on the bar you are editing.
7. Piano and recording
Click the Piano bar (or press P): a keyboard opens at the bottom of the screen. It plays on the track selected in the sequencer.
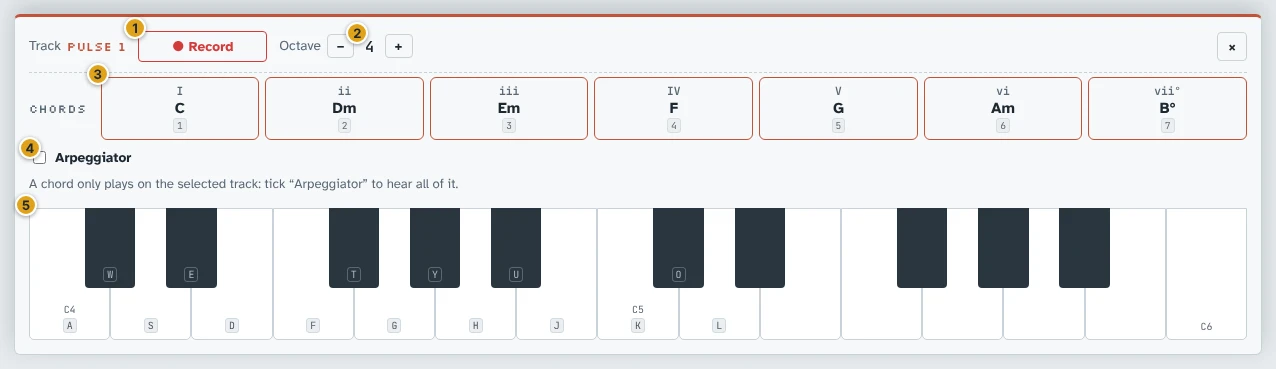
- 1● Record (R): records what you play.
- 2Octave − / +: lower or higher (keyboard: Z and X).
- 3The scale’s chords, keys 1 to 7 (see the next chapter).
- 4The Arpeggiator.
- 5The keyboard: with the mouse, a finger, the computer keyboard (letters are shown on the keys) or a connected MIDI keyboard.
The letters follow a piano layout: A S D F… for the white keys, W E T… for the black ones. On AZERTY or QWERTZ keyboards, use the keys in the same position.
Recording what you play
- Select the track and the starting bar in the sequencer.
- Tick Metronome if you want to hear the beats.
- Click ● Record. The studio counts one bar in (“4, 3, 2, 1”), then the song rolls.
- Play! Your notes are written into the grid, snapped to the nearest step.
- Click ■ Stop (or Space). Missed it? Ctrl+Z undoes the whole take.
On the Noise track the keyboard becomes drum pads: A kick, S snare, D hi-hat…
8. Chords and arpeggios
A chord is a group of notes that sound good together. The seven Chords pads on the piano offer the chords of your scale: they all fit together, in any order. The Roman numeral (I, ii, IV…) gives their place in the scale; I is the “home” chord songs like to end on.
Since each track plays only one note at a time, a chord can only sound in full in two ways:
- The arpeggiator: tick Arpeggiator, then hold a pad or several keys. The chord’s notes are played one after another, fast and in time: the typical video game sound.
- Spread over 3 tracks (Advanced mode): the bass goes to the Triangle and two notes to the Pulses.
Without either, a pad only plays the part of the chord that belongs to the selected track.
Advanced mode adds more settings: chord type (seventh, sus4…), inversion, One piano key = one chord, and Write into the grid, which writes each clicked chord into the selected bar then moves on to the next. The arpeggiator gains its pattern (up, down…), speed, number of octaves and Latch (the arpeggio keeps going after you let go; Esc stops it).
9. Styles and rhythms
This panel writes the drums, bass and accompaniment of a music style for you, over a chord progression in your scale.
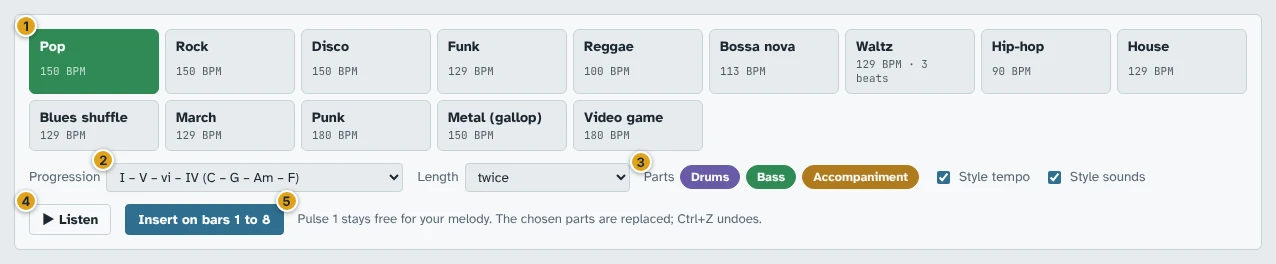
- 1The style: pop, rock, funk, reggae, bossa nova, waltz, hip-hop, blues, video game… with its tempo.
- 2The chord progression, and its length (once, twice or four times).
- 3The parts to write: click a chip to remove or add it.
- 4▶ Listen: plays the result without changing anything. Switch styles while listening to compare.
- 5Insert: writes it all from the selected bar onwards.
Pulse 1 stays free for your melody. The written cells are ordinary cells: you can then edit them note by note. And Ctrl+Z undoes the insertion.
10. Advanced mode
Click Advanced at the top right. Your song doesn’t change; extra settings appear.
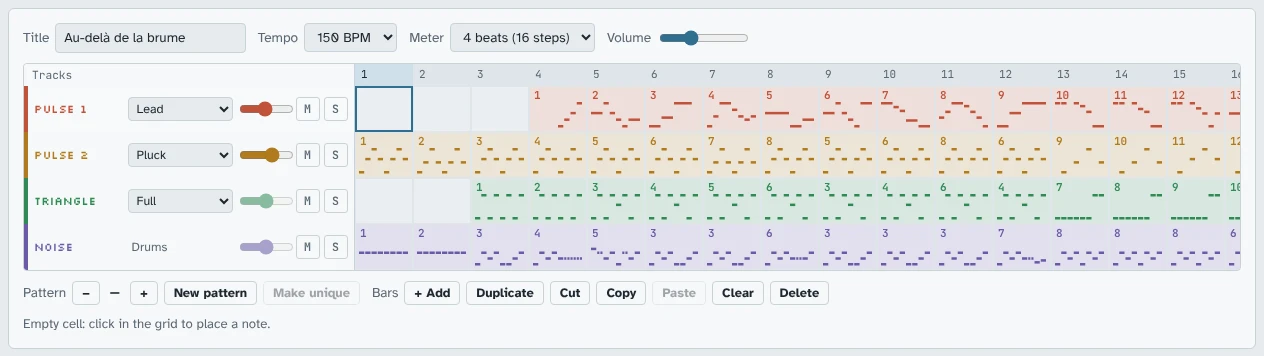
Patterns
In Advanced mode each cell carries a pattern number. Two cells with the same number play exactly the same notes: editing one edits the other. Handy for a drum beat that repeats throughout the song: fix it once, it’s fixed everywhere.
- Type a digit (0–9) on a selected cell to give it that pattern, or use the − / + buttons next to Pattern.
- New pattern creates an empty pattern; Make unique turns the cell into an independent copy.
In Simple mode this sharing is invisible: editing a cell never affects the others.
Other settings
- Panning: the small slider next to the instrument places the track left or right (double-click: center).
- Meter: 4 beats or 3 beats (for a waltz).
- Follow: untick it so the editor doesn’t follow playback.
- Snap: untick it to place notes outside the scale. Dotted lengths become available.
- Step input: each key you play writes a note at the cursor then moves on; ← → move the cursor, ⌫ erases.
Adjusting each note
A strip aligned with the notes appears below the grid. Choose what it adjusts in Below the notes:

- Velocity
- How hard each note is played. Pull bars down for soft notes (“ghost notes”), leave them up for accents.
- Arpeggio
- The note cycles very fast through a chord (major, minor…): the old games’ “chord on a single track” effect.
- Slide
- The note glides from the previous one (portamento), or drops sharply: on the triangle, a two-octave drop imitates a kick drum.
- Timbre
- The tone colour of the pulses: thinner (12.5 %), hollower (50 %), or wavering during the note (PWM).
Choose the Effect, then click below a note to apply it; click again to remove it. Dragging across notes applies it to all of them.
11. Effects
The Effects bar opens a rack of five modules that transform the sound of the whole song.
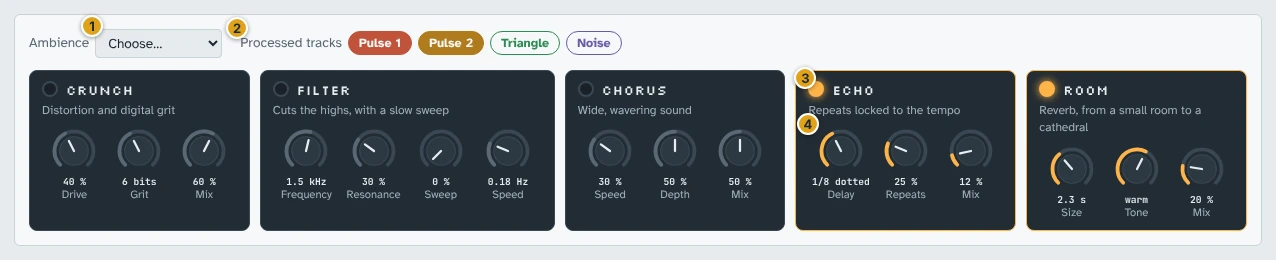
- 1Ambience: ready-made settings (Small room, Cathedral, Dream, Underwater, Pirate radio…). The easiest way to start.
- 2Processed tracks: highlighted chips go through the effects. Turn the drums off to keep them dry, for example.
- 3The LED turns a module on or off.
- 4The knobs: click and drag up or down to turn them (Shift for fine adjustment, double-click to reset).
| Module | What it does |
|---|---|
| Crunch | distorts and degrades the sound, like an old radio or a 1-bit console |
| Filter | cuts the highs, with a slow sweep (“underwater” sound) |
| Chorus | widens the sound and makes it waver |
| Echo | repeats the notes in time with the tempo |
| Room | adds reverb, from a small room to a cathedral |
WAV export includes the effects (in ENHANCED mode).
12. PURE or ENHANCED
This switch, in the playback bar, changes what you hear (and what is exported as WAV), never your score.
- ENHANCED (default): with what the studio can do beyond the console: effects, stereo, velocity on the triangle.
- PURE: exactly like the real 2A03 chip: no effects, mono sound, triangle always at full volume. Ideal if your music must run on a real console or in the game engine.
Arpeggios, slides, envelopes, timbres and drums exist on the chip: they stay active in PURE.
13. Keep, share, export
- Automatic saving
- The current song is kept in this browser, on this computer. Careful: clearing the browser’s data erases it, and another browser can’t see it.
- Save
- Downloads a
.brume.jsonfile. Keep it safe: it’s your complete, editable project. Reopen it with Open, on any computer. - Export WAV
- Downloads the song as an audio file that plays anywhere (music player, video editor, sharing). Muted tracks are not exported.
- Copy the score for the game engine
- In About: copies the score in the library’s text format, for use in the BRUME engine.
14. Keyboard shortcuts
| Key | Action |
|---|---|
| Space | play / stop |
| Ctrl+Z · Ctrl+Shift+Z | undo · redo |
| A W S … K | play notes (QWERTY positions, also works with AZERTY and QWERTZ) |
| Z · X | octave down · up |
| P | show / hide the piano |
| R | record on the selected track |
| 1 … 7 | chord pads (piano open) |
| Esc | stop all notes and the latched arpeggio |
| ↑ ↓ ← → | move in the sequencer (Shift to extend the selection) |
| Enter | edit the selected cell |
| 0 … 9 | choose the cell’s pattern (Advanced mode) |
| Ctrl+C / X / V | copy / cut / paste bars |
| Ctrl+Shift+V | paste and insert |
| Ctrl+D | duplicate bars |
| Del | clear the selected cells |
| Alt + drag a cell | copy it instead of moving it |
On a Mac, Cmd replaces Ctrl and Option replaces Alt.
15. FAQ
I can’t hear anything.
Check the computer’s volume and the studio’s Volume slider. Click once in the page (browsers block sound before the first click). Check that no track is soloed (S lit) or muted (M lit). Finally, playback starts from the selected bar: if it’s empty, select bar 1.
I deleted something by mistake.
Ctrl+Z, as many times as needed. The studio remembers the last 200 actions.
My note sounds wrong.
Stay on the editor’s light rows: they are the notes of the scale. Also check that all tracks use notes from the same scale.
I can’t play two notes at once on the same track.
That’s normal: the imitated chip is monophonic, one note per track. Put the harmony on Pulse 2, or use the arpeggiator.
The computer keyboard doesn’t play notes.
First click outside any text field (the title, for example): while you type in a field, keys write text.
My MIDI keyboard isn’t recognised.
Open the piano: that’s when the studio asks for MIDI access. Accept the browser’s request. Chrome and Edge support MIDI; some browsers don’t.
Where has my song gone?
It is kept in the browser where you created it. If you changed browser or computer, or cleared your browsing data, it’s no longer there: reopen your latest .brume.json file with Open.
I want to use my music in a video.
Use Export WAV: the file imports into any video editor.
16. Short glossary
- Arpeggio
- The notes of a chord played one after another.
- Bar
- A small slice of time, usually four beats. A song is a series of bars.
- Beat
- The pulse you tap your foot to.
- BPM
- Beats per minute: the speed of the song.
- Chord
- Several notes that sound good together.
- Octave
- The same note, lower or higher.
- Pattern
- The contents of a cell. Several cells can share the same pattern (Advanced mode).
- Scale
- The family of notes a song uses. Staying in the scale avoids wrong notes.
- Step
- The smallest division of the grid: a quarter of a beat (sixteenth note).
- Tempo
- The speed of the beats.
- Track (channel)
- One of the chip’s four “voices”: Pulse 1, Pulse 2, Triangle, Noise.
BRUME STUDIO · Romain Rosay · A question about this guide? Write to me